![Switch To.. Parts Of A Flashlight & How It Works [Reflectors]](https://www.besttacticalflashlights.net/wp-content/uploads/2020/03/Parts-Of-Flashlight-1-o_6d77f360cea6f15a91a42c175641b8cd_2000.jpg)
The parts of a flashlight are pretty basic. The way a flashlight works is a battery gives power to a light source based on whether a switch closes the circuit or not.
We know you are here to check out the parts of a flashlight but after you read through this you might want to see a couple articles that most people like looking over. First is this article where we have a list of our favorite lights from each buyer’s guides. And then here where we keep track of the brightest lights on the market.
At the basic level, we have the following parts
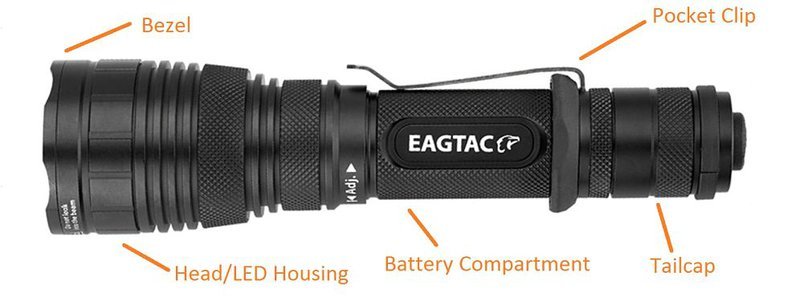
- The bezel
- The head or LED housing
- The battery compartment
- A switch
- A tail cap
Until we get into recharging electronics and drivers then it gets way more complicated. We will first go through these basics that are found on the outside of the flashlight and then we will dive deeper into each part of the flashlight.
Basic Flashlight Parts

Let’s go through these parks to show what they do.
The Bezel
The bezel it is just the front part of the flashlight right where the lenses.
In recent times the bezel has been thought of as something that can be used to hit somebody as in tactical flashlights. Typically this would be called a strike bezel.
A strike bezel usually has some kind of points or curvature on the bezel to make it so the point of impact is smaller so there is more force impact point. This is called a crenulated bezel.
The Head
The head is the part of the body that holds the LED, the reflector, the lens, the driver for the light, and most everything else that really makes the flashlight work.
The Battery Compartment
The battery tube is really just a compartment to hold the battery. It also gives you the part that you are usually hanging on to.
Now in intrinsically safe and explosion proof flashlights the battery compartment is one of the most important parts of the light. These lights are dependent on inside power not coming outside in dangerous atmospheres.
The Tail Cap
The tail cap is the part that holds the battery in.
It also completes the circuit if you just tried to hold the battery in with a piece of tape the flashlight wouldn’t work.
Lots of times the tail cap has a tail switch in it.
The design of the tail cap is important for many uses. The most important one being to tail stand. This is when you can put a light standing on its tail pointing up. This is great for being able to use the light without holding it.
How well all of these parts fit together make a big difference in the durability and strength of the light. One of these factors that is measured and on the ANSI FL1 standards is the IP Rating which determines how waterproof and dustproof an electronic is.
Now to the next section…
Flashlight Light & Beam
The light source is usually limited to the head of the flashlight. There are some flashlight coming out that have LEDs on the side so you can use them more as a flood light in along with the typical use of a handheld light.
The Light Source
There are lots of ways to produce light. Now days in LEDs are the most popular. But some other are Incandecent bulbs, HID lights, Xenon lights, candles (haha).
Just looking at LEDs they can be designed in different ways to produce different outcomes based on the geometry, color, and power capabilities of the design.
With geometry some LEDs come with covers that look like a drop of water is stuck over the top. This is called the LED dome. This helps diffuse the light.
But you might not want that so there are others without a dome. This is called de-domed.
Another geometry aspect is the size of the LED depending if it is bigger or smaller it will react differently with the reflector which we will get to next.
The color of the light also makes a big difference since humans do not see all colors equally. The more blue the white light is it usually appears to be brighter. But, the more color that you have in the beam the object that you are shining on changes colors too. Some thing to look at if you are interested in this CRI (Color Rendering Index).
If you want to research more into light sources and LEDs then here are some of our other articles.
Cree Flashlight LEDs: Bulb Types and Comparison
Maglite LED Conversions & Upgrades
Cool White Vs. Neutral White LEDs
Warm White Vs. Cool White LEDs
The Reflector
The reflector is the mirror part inside by the light source. Not all flashlights have this but most do.
The point of the reflector is to get all of the light that is going off to the sides of the LED to go out the front of the flashlight.
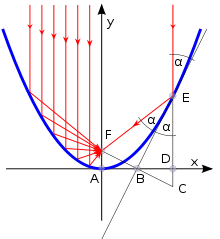
The shape of the reflector is a parabola which makes it so any light coming from the focus point (F in the image) will be reflected forward.
Reflectors also come in different finishes. The most popular are smooth like a mirror or “orange peel”. An orange peel reflector smooths out the beam by having small bumps in the surface it gets rid of hot spots coming off of the LED.
The Lens
The lens of a flashlight is most importantly there to protect the LED.
The lens of a light could be color or different shapes to change the beam. Different colors are obvious in what it would do.
There is a shape called an aspheric lens. An aspheric lens has a similar purpose to the parabola in the reflector. It can take beams of light that are heading out of the light at an angle from the focus point and bend them to go directly out of the front of the light.
An aspheric lens can increase the throw of a flashlight by concentrating the light power in a specific direction. With this you do lose the flood of the light around you.
How the lens is installed is also a big part of if the flashlight is waterproof or not.
How Does A Flashlight Work (The Electronics)
The Battery (Power Source)
There are lots of different sizes of batteries in and many different chemistries that work. The basics are that this is where the light source gets its power.
Depending on if it is one battery or many and if they are connected in parallel or in series. Or, depending on the battery type the overall voltage of the battery the light can produce different levels of brightness with certain LEDs
The Switch
The point of the switch is to close the circuit from the battery to the LED. Once this is done the LED lights up.
There are simple switches and if a battery has a driver with memory you can have switches that can access lots of different modes and brightness levels.
The Light
We already covered this earlier. For most purposes this will be an LED that gets powered by a battery.
Other Flashlight Parts
The Driver
The driver is the part that makes all of the complicated modes possible. It is responsible for modes, memories, and determining how much power is pulled off of the battery to run the LED.
The driver is where there is lots of art involved with flashlight brands. Finding the right balance of user interface (UI) with user experience (UX).
The driver could run the battery out really quickly and produce tons of light but the flashlight will get hot and you will only get 2 minutes of light. Or the driver could step down depending on voltage or time to make a light that is both bright and usable.
Integrated Charger
Many flashlights are starting to come included with chargers. This is great since the ability to properly charge li-ion batteries in the past has been pretty complicated. But, li-ion batteries pack the most power for size out of the available batteries using in flashlight currently.
So with an integrated charger you are sure that the limits on the charger have already been set to charge the battery the best way for this light. Some people like to still charge their own batteries but for the general public this is great and goes along with the typical user knowledge.
If you are looking for a good light with integrated charging check out our rechargeable light guide.
Pocket Clips
This is an obvious one… it helps you hold the flashlight in your pocket or maybe clip it to your hat. There are good and bad designs here too.
The deeper the clip goes along the light usually the more stable it is and if you have a clip that is mounted to the light with screws instead of a tension clip it will hold better.
Attachment Loops
These can be good or bad depending on if you want them. We think it is a little silly to put little keychain loops or lanyard loops on big flashlights that would never be used for those purposes.
It just gets in the way.
But if you want a keychain light… then the quality and positioning of this little loop could make or break your buying decision.
Conclusion
So there you go, the parts of a flashlight. We hope that you found the information that you were looking for in this article.
Now that you know all of the parts if you have a flashlight you can focus on taking care of it, maintenance is important.Thanks for visiting our site. If you are looking for anything else related to flashlights go over to our homepage and look around.